Gardening at Home
Benefits of Gardening At Home
When you grow your own food you are more likely to eat the fruits and vegetables you grow!
- Builds self reliance and resilience – Learn how to feed ourselves so we don’t have to rely on others
- Soil, water, sunshine and air can improve our mental health and wellbeing
- Requires movement that makes us healthier
- Cost savings
- Intergenerational interactions – people of all ages can come together to garden
- Beautifies spaces
Types of Gardens

Preparing To Set Up Your Space
The size of your space and your budget will determine how much food you can grow and which way to grow makes the most sense.
Sunlight Exposure of Your Garden Location
One of the most important factors to consider for vegetables as well as flowers—if not the most important factor—is sunlight exposure. To thrive and do their best, most vegetables need “full sun,” which is defined as “at least 6 hours of unobstructed sunlight per day.” In most cases, more light (8 hours) is even better.
Some crops, such as broccoli, lettuce, spinach, and other greens, can tolerate less sunny spots (described as being “partial sun” or “partial shade”). In general, the more sunlight your garden receives, the greater the quantity and quality of your crops.
Tip: In cooler climates, a suntrap or cold frame is ideal for tender crops. In hot climates, growing under shade cloth or in the shadow of taller climbing plants, such as pole beans, helps to expand the choice of what you can grow in these conditions.
Water Accessibility
Be sure water is nearby and readily available near your gardening site. Nothing burns out a beginning gardener faster than having to lug water to thirsty plants during a heat wave. Plus, having water nearby means that you’re a lot less likely to skip out on watering if you’re feeling a bit lazy one day!
Extra water is likely to be necessary during dry spells, so locate new garden beds close to an outdoor water source. The soil near walls, fences, and overhanging trees tends to be too dry for good plant growth, which is why an open area is best.
Water conservation should also be something that you take into account when planning out your garden. Read more about watering here.
The Garden Site’s Protection From Wind
Be sure your location is protected from heavy wind. Shelter from winds is helpful for most crops, especially those that grow upright and produce abundant amounts of fruit, such as tomatoes, peppers, eggplant, peas, beans, and any other climbing vegetables.
Strong winds dry out plants and soil and can topple extra-tall plants like corn and sunflowers. Wind also causes most plants to reduce transpiration and growth. Cold, dry winds are the worst, as they suck moisture from plants, searing leaves and causing wind burn, which destroys leaves and flowers.
Bear in mind that solid walls or fences may provide shelter, but they can also cause the wind to form destructive turbulence on the sheltered side, so don’t plant too close to them. Hedges and open or woven fences are more effective, as they filter wind rather than deflect it.
Soil Quality of Your Garden
The ideal garden location has rich, loamy soil. If you have lousy or too-thin soil, you are out of luck, or you’re going to need to do some work to prepare the soil for growing (see below). One quick way to judge the quality of your soil is to look at your yard, especially if you have a lawn. If it’s lush and healthy, then you probably have decent soil.
“Loamy” soil is composed of almost equal amounts of sand and silt with a little less clay. A good ratio is 40 percent each of sand and silt and 20 percent of clay. This is the ideal composition for growing most plants. If your soil has too much clay or too much sand, this will be a problem, and you will need to amend it with organic matter. Clay soil that remains wet for too long will suffocate plants, while sandy soil may drain too quickly, parching them. Both conditions inhibit nutrient absorption by plant roots.
Good soil drains well. If you wish to test the drainage in your garden soil, dig a test pit about 1 foot deep, wide, and long. This pit will reveal if there is standing water under the surface. It will also allow you to observe how the soil drains. To test, add ½ gallon of water to an already damp pit and time how long it takes to drain. If it takes a number of hours, that’s OK, but if it takes days, water may pool under the surface in the summer when you irrigate, suffocating roots and creating anaerobic soil conditions.
The very best way to figure out the quality of your soil is to get a soil test done. Many university extension services will test your soil for a small fee (or for free), providing you insight into its structural quality (sandy, loamy, or clayey), as well as its pH level (acid or alkaline?) and its nutrient health (considering nitrogen, potassium, and other necessary elements that plants need to grow well).
Of course, if you’re growing in containers or raised beds, you do not have to worry as much about the soil under your gardening area. For raised beds, however, you should still consider getting your soil tested, as plants’ roots may eventually extend beyond the raised bed itself. This is especially important in urban and suburban areas, where lead and other harmful materials may be a concern.
→ Learn more about preparing soil for planting and soil amendments.
Set Up Your Growing Space
- Construct raised beds as needed or obtain grow bags or containers
- Purchase or make your own soil
- Add fertilizer
Planting
Planting seeds is the first step to starting the plant cycle. There are a few ways that you can plant seeds.
Direct sowing means planting seeds directly in your grow bag, a container outside, or a raised bed garden. This way of planting seeds is necessary for root vegetables that grow underground like carrots, beets, onions, and potatoes. It’s also necessary for plants that don’t like to be transplanted, or moved from a smaller container where they first started growing to a larger container where they will continue to grow.
To direct sow, follow the directions on the back of your seed packet. Watch a video about how and why to direct sow seeds at https://www.youtube.com/watch?v=6xhC40u6R2Q.
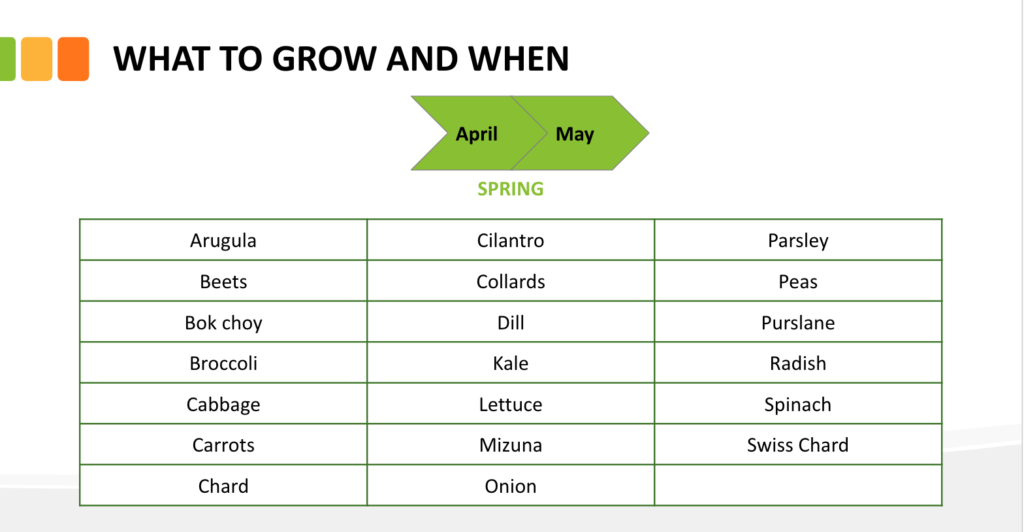
You can direct sow the following plants:
- Arugula
- Beets
- Bok choy
- Broccoli
- Cabbage
- Carrots
- Chard
- Cilantro
- Collards
- Dill
- Kale
- Mizuna
- Radish
- Spinach
- Swiss Chard
- Onion
- Parsley
- Peas
- Purslane
- Radish
- Spinach
- Swiss Chard
It can be helpful to start some seeds indoors so the plants have a chance to grow before you plant them outside. This increases the chance that they will survive and helps them produce more food for you. If you don’t want to start your own seeds indoors you can purchase seedlings from local nurseries. Starting seeds indoors can take some special equipment and practice, but trying is a great way to learn. Watch the videos below to learn more
about starting seeds
- Starting Seeds – https://www.youtube.com/watch?v=aJHiYC-Im9Y
- Recommended Materials – https://www.youtube.com/watch?v=l6uGsTmTUks
- Common Mistakes – https://www.youtube.com/watch?v=l5o6LR81o_s
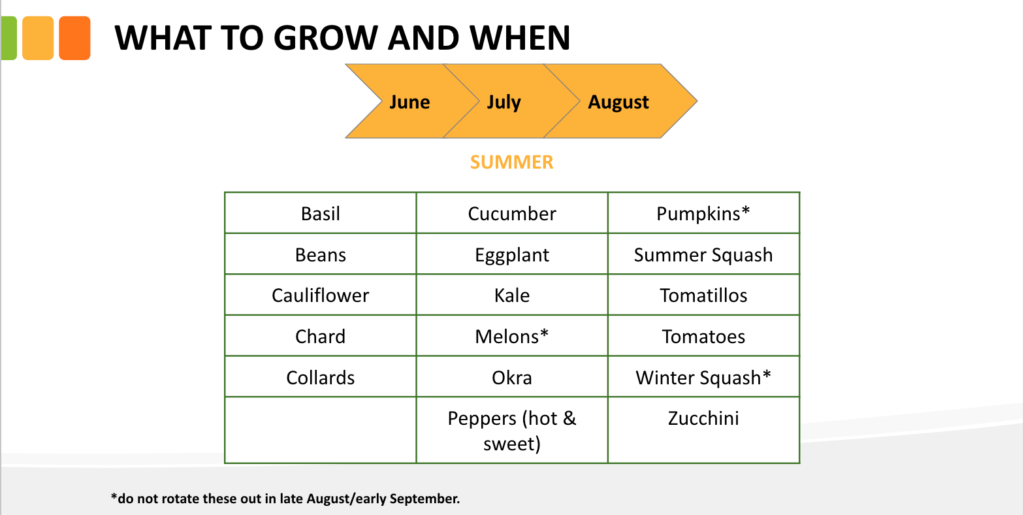
The following plants need to be started indoors:
- Basil
- Broccoli
- Cabbage
- Cauliflower
- Celery
- Eggplants
- Hot Peppers
- Oregano
- Pumpkins
- Rosemary
- Sage
- Sweet Peppers
- Sweet
Potatoes - Thyme
- Tomatoes
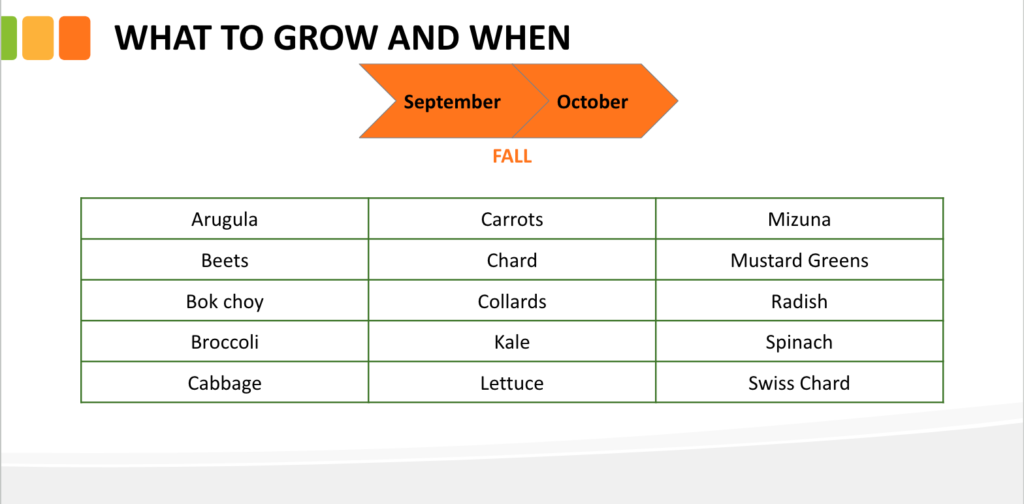
The following plants can be directly sowed OR started indoors depending on the time of year:
Melons (cantaloupe, watermelon): Start indoors in the spring
Cucumbers: Start indoors in the spring. Plant outside in late July.
Kohlrabi: Start indoors in the spring. Plant outside in early September.
Lettuce: You can start indoors in the spring so your plants produce leaves that you can eat more quickly. Plant outside in mid-September.
Pumpkins: Start indoors in the spring. Plan outside in mid-June.
Zucchini: Start indoors in the spring. Plant outside in late July.
- Seedlings are small plants. They can be purchased from a nursery or you can start your own. Make sure to harden them off, which means gradually get them used to the sunlight outside. If you buy seedlings, ask if they have been hardened off.
Watch a video at https://www.youtube.com/watch?v=Myj9knApS0w to learn about how to harden off seedlings.
Once your seedlings have been hardened off, they are ready to be planted in your container or raised bed. See page 13 to make sure that you have the right size container for your plant.
Watch the videos below to learn more about planting seedlings.
Instructions for planting seedlings
Materials
- Fabric grow bag, raised bed or container (check page 14 to make sure you have the correct size)
- Soil
- Slow release fertilizer
- Seedling
- Hand shovel (optional)
- Gardening gloves (optional)
Instructions
- Fill your container 3⁄4 full with soil
- Read the instructions on your slow release fertilizer and add the correct amount based on the size of your container
- Mix the fertilizer into the soil
- Add the rest of your soil to the container so it is full almost to the
top of the container - Dig a hole in the soil that is large enough for your seedling’s
container to fit inside - Gently remove your seedling from the container by lightly squeezing
the slides of the container and tipping it upside down so the plant
slides out. Catch the plant so it doesn’t hit the ground. - Gently loosen the soil around the roots of your plant by squeezing
it lightly with your hands. - Place your seedling in the hole that you dug
- Fill in the hole with the soil that you dug out of it
- Water your plant right after planting it.
- If you would like to plant more seedlings in the same container,
watch a video about plant spacing at https://www.youtube.com/watch?v=7MGzK9q89O0.
Think of plant spacing as a circle around your plant. From where your plant is planted in all directions, nothing should be within its spacing zone.
One way to visualize plant spacing is to use a ruler and string.
Visualizing plant spacing activity
Materials
- Ruler
- String
- Scissors
Instructions
- Reference the plant spacing table below and find your plant. Don’t see your plant – feel free to look up plant spacing information for your plant online.
- Once you know how much space your plant needs, measure a piece of string that length
- Hold the piece of string in one hand next to the stem of your plant
- Pull the string tight – you will be able to see how much space your plant needs. Remember that it needs this much space on all sides.

How much space does my plant need to grow?
Your plant will be more than happy to continue to grow in the grow bag that we gave you. If you want to grow other plants in your grow bag once this plant dies or want to have more than one grow bag, it’s important to know what size grow bag your plant needs.
The table below lists required container sizes for a variety of plants. Root vegetables (carrots, beets, onions) will require deeper bags or gallons at a minimum of 7 gallons.

Tending To Your Garden
Watering
Just like humans, plants need water to survive. Plants get water from rain or from us watering them. It’s important to think about where you will get water from to water your plants.
Water sources:
- Your house using a watering can
- An outdoor hose with a spray nozzle
- A rain barrel – please note that it is not recommended to use collected rain water for produce plants
Check your seed packets or research online to learn how much water your plants need.
Fabric grow bags and containers dry out more quickly than raised beds.
Always consider where you will get water from before establishing your garden.
- Water is a finite resource which means that we could run out of it some day. Because of this, it’s important that we conserve or use as little water as we can when watering our plants.
- Ideally water your plants each morning before it gets too hot (establish a daily routine)
- Before watering, feel the soil below the surface to see if it feels damp (stick your finger in up to the first joint). If it is still damp you don’t need to water your plants. You also don’t need to water your plants if it has just rained or is going to rain.
- For more guidance on specific water requirements for your plant check the seed packet or email CGF.
- Water your plants slowly, making sure the water doesn’t flow over the sides of the container. Stop watering once you see water flow out of the bottom of the container.
- Always water at the base of the plant and try to not get the leaves wet. Wet leaves attract pests and can cause diseases.
- Please Note: Containers will dry out more quickly than raised beds and in-ground gardens.
Insects & Animals in you Garden
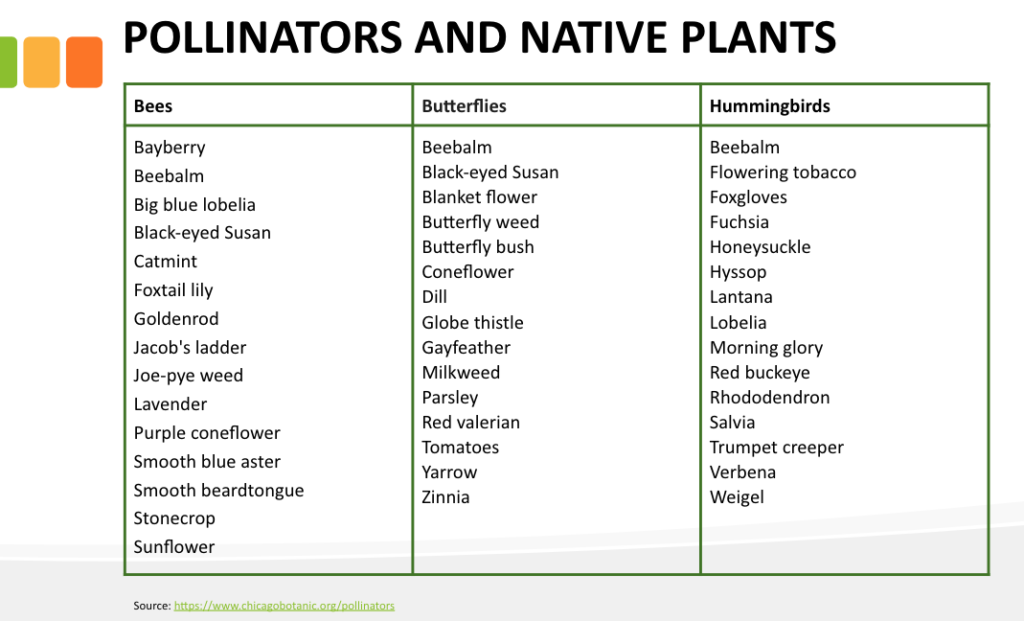
Guests in the Garden – Wanted & unwanted
Gardening with urban wildlife – We are lucky to live in an urban environment co-existing with creatures of all kinds. These animals and insects are essential parts of our urban ecosystems
- Our gardens are also part of this ecosystem (or it is best if they are). When you plant a garden, you are sending out an invitation to other species. You are guaranteed to have guests.
- Some guests we are excited to see.
- Examples: Monarch Caterpillar on Milkweed, Black Swallowtail Caterpillars on Dill, Ladybug on leaf, Bumblebee, goldfinch, squash bee, eastern tiger, rusty-patched bumble bee, monarch, cardinal, ruby-throated hummingbird, hummingbird month
- Some guests we are not so thrilled to see.
- Examples: beetles, squash bugs, rabbits, squirrels, rats, raccoons
- Some guests we are excited to see.
- Many creatures are complicated. What might be considered a “pest” in some situations can also be or become an important part of our garden ecosystem.
- Example: The Tomato or Tobacco Hornworm is the bane of tomato plants. But it is also a caterpillar who morphs into the Sphinx Moth – a very beneficial pollinator
- We need the unpopular guests to attract the beneficial guests.
- Example: Chickadee eating a cabbage looper
- We need the unpopular guests to attract the beneficial guests.
- How do we strike a balance – allowing some wiggle room for some unpopular, less beneficial guests to attract the more beneficial guests.
- Like any thriving ecosystems, our gardens are all about diversity and balance
- So how do we co-create a healthy balance in our gardens?
- How can we grow gardens that are inviting to our wildlife friends and even to some degree our frenemies?
- As organic gardeners, how can we avoid poisons and pesticides and implement natural solutions to garden with nature, instead of against nature?
Physical and preventative controls work best. When you see that the damage is done to your plants, then it’s probably already too late.
Walk through your garden as much as possible to not only ground yourself, but to also check for any issues. Look at plant stems and foliage, and under leaves where insects like to lay their eggs. Prune off and dispose of dead/diseased plant parts. Hand pick off insects.
Wrap duct tape, sticky side out, around your fingers and tap the insects or larvae. They’ll come off on the tape.
#1) Just say no to monocultures, plant a diversity of plants
- A monoculture (aka too much of any one thing) is ripe for disease and destruction and more vulnerable to loss. Not to mention it robs the soil of nutrients and harms beneficial bacteria and microorganisms.
- Biodiversity is key! The more diverse your garden is, the more resilient it will be.
- A diverse garden:
- attracts a greater variety of insects and wildlife – which in turn creates a healthier garden ecosystem.
- creates habitat – which supports beneficial wildlife.
- minimizes weeds and improves soil – which makes diseases less likely.
- is a vibrant jungle of vegetables, herbs, fruits, and flowers – is more fun and has more flavor.
#2) Try Crop Rotation
- This can be difficult in our small urban spaces, but it’s possible.
- Different plants need different nutrients and a vegetable plant grown repeatedly in the same spot will deplete the soil of those nutrients over and over again.
- And sometimes an insect or disease will force your hand.
- For example, Squash Vine Borers overwinter in the soil and once established, they will gut your squash vines year in and year out.
#3) Companion Planting
- Plants need friends, too. Grow plants together that benefit and support one another. Companion plants can help increase soil nutrients, encourage beneficial insects, deter unwanted wildlife, and support pollinators.
- Some examples for beneficial insects:
- Lettuce & Sweet Alyssum (aphid control)
- Broccoli & Cosmos (aphid control)
- Cucumber & Dill (cucumber beetle control)
- Squash & Nasturtiums (squash bug control)
- Cabbage & Chamomile (cabbage worm control)
- Tomatoes & Basil (thrip & hornworm control)
- Peppers & Radishes (radish serves as a trap crop)
- Some examples for native pollinator support:
- Strawberries & Golden Ragwort/Common Cinquefoil/New Jersey Tea/Golden Alexanders (Mason Bees, Miner Bees, Hoverflies)
- Blackberries/Raspberries & Jacob’s Ladder/Smooth Penstemon/various Indigos (Bumblebees, Sweat Bees, Carpenter Bees)
- Tomatoes/Peppers/Eggplant & Tall Coreopsis/Obedient Plant/Purple Prairie Clover/Leadplant/Blue Wild Indigo/Wild Bergamot/Purple Coneflower (Bumblebees, Carpenter Bees, Hawk Moths, various Butterflies)
- Some examples for native pollinator support:
- Green Beans & Common Milkweed/Butterfly Milkweed/Prairie Blazing Star/Wild Bergamot (Bumblebees, Leafcutter Bees)
- Squash/Zucchini/Melons & Common Sunflower/Tall Coreopsis/Purple Prairie Clover/Tall Thistle/Wild Bergamot/Leadplant (Bumblebees, Squash Bees, Eastern Carpenter Bees)
- General Native Plants for Your Vegetable Garden: Partridge Peas, Purple Prairie Clover, Wild Bergamot, Pale Purple Coneflower, Purple Coneflower, Leadplant, Blue Wild Indigo
- The Native American Three Sisters Garden is the perfect example of companion planting. Grow corn, beans, and squash together.
- Corn = serves as trellis for beans
- Beans = fix nitrogen back into the soil
- Squash = provides a living mulch to prevent weeds and also deters unwanted insects and animals
#4) Try Trap Crops
- Every garden needs some sacrificial offerings. Trap cropping uses plants as decoys to distract and draw away insects and other wildlife from your desirable crops.
- You can use the same species as your main crop to serve as sacrifice plants. Or you can use different species as decoys.
- What are some good trap crops?
- Radishes (flea beetles, Harlequin bugs)
- Amaranth (cucumber beetles)
- Nasturtiums (aphids)
- Sunflowers (stinkbugs)
- Zinnias (Japanese beetles)
- Marigolds (nematodes)
#5) Plant for Pollinators, Predators, and Parasitizers
- One of the best methods for deterring unwanted creatures is to provide food and habitat for the species you do want. When you plant for beneficial bugs, you create a healthier ecosystem as a whole and your garden will thank you.
- Pollinators = bees, butterflies, flies, moths, wasps, hummingbirds
- Honeybees are pollinators, but they are not as efficient or specialized as our native bees. They rely on native plants for food and habitat, so planting native pollinator plants will attract them. They will ensure better pollination of your food plants and some will eat the detrimental insects as well.
- For example, Hover flies are excellent pollinators and their larvae are aphid-eating machines. Plant Coreopsis, Coneflower, Black-eyed Susans, and Sunflowers to attract them
- Predators = Ladybugs, lacewings, praying mantid, spiders, assassin bugs, soldier beetles.
- They eat other bugs and you want them in your garden. Did you know ladybug larva can eat up to 40 aphids an hour?
- Attract them with flowering herbs and pollinator plants like Dill, Cilantro, Butterfly Milkweed, Alyssum, Marigolds, Cosmos, Bee Balm, Yarrow, Goldenrod, etc…
- Parasitizers = Parasitic Wasps
- Like something out of a sci-fi movie, they lay their eggs on or in other bugs and their larvae feed on the host insects.
- Brachonid Wasps like to lay their eggs on the Tomato Hornworm. Once the eggs hatch, the baby wasps chow down on the host.
- Mosquitoes – The best way to control mosquitoes is to control their larval stage. Use mosquito dunks to do this. Mosquito dunks use a non-toxic bacteria (BTI) that targets mosquito larvae.
- In spring, get a bucket, fill it with water, add a handful of straw or hay, set it out in the sun, and add a mosquito dunk
- The female mosquitoes will lay their eggs in that bucket brew and the dunks will do their work
- Each dunk lasts a month
All of the general tips are great strategies for incorporating biological controls and creating a healthy ecological balance in your gardens—especially when it comes to insects. But what about those other garden visitors—rabbits, rats, squirrels, raccoons, etc.? How can we discourage them from chomping on our plants?
Here we can look to nature as well. The right plants are often natural deterrents for many of these furry garden munchers.
- Interplant the following with your food plants or as a border around your garden:
- For example:
- plants with a strong scent can sometimes discourage wildlife
- for rabbits try onions, garlic, lavender, sage, hyssop, sweet alyssum, catnip
- for squirrels try nasturtiums, mustard
- for rats try onions, mint, echinacea, thyme
- There are also old-time remedies passed down from elders (not known to be scientifically proven).
- hair can keep bunnies out of her garden so she hits up her hairdresser for bags of hair.*
- predator urine (fox or coyote pee)*
- cayenne pepper*
- talcum powder*
- dried blood meal*
- hot sauce and dish soap
- Irish Spring soap shavings*
*all of these need to be reapplied again and again as the rain washes away the scent or they loose their effectiveness
- Some people recommend clear glass jars of water, mirrors, or aluminum foil because rabbits and squirrels are scared of the reflection.
- Speaking of foil, if you have squash vine borer problems, try wrapping your young squash stems in aluminum foil. This helps to prevent the larvae from burrowing into the stems.
- Physical barriers are your best course of action against hungry guests in your garden. Fencing, screening, netting, row covers, wire cloches, etc.
- Chicken wire fencing or 1/4 hardware cloth: Install this around your beds about four feet off the ground. Critters can still dig under so bury it six inches deep as well. – You can also wrap this around individual plants like a cylinder for protection.
- For raised beds, install hardware cloth or wire mesh at the bottom of the bed to deter burrowing creatures like rats and gophers.
- Try wire cloches or even dollar-store waste baskets to cover young tender seedlings and other vulnerable plants like lettuce.
- Netting is a good protection against many animals, including birds. But it won’t deter insects and remember, you want those birds to eat some of the insects on your plants.
Rats eat what we eat and they love messy areas and dense plantings where they feel protected. They also burrow to make their nests.
- Seal compost bins and garbage cans
- Remove access to food and water sources, including pet food and fecal matter
- Remove clutter and cut down grass and weeds
- Rats navigate w/ their whiskers and they prefer to use walls, curbs, and foundations to get around. Cut back vegetation 2 feet from the sides of buildings. They won’t have as much cover and they’ll be less likely to travel through these exposed areas.
- Last Resort – Traps. Check with the city before installing.
The 17-year periodical Cicada will be emerging in Northern Illinois in 2024. In central Illinois it will be synced with the 13-year Cicada emergence. For about 4–6 weeks (from around mid May to late June), millions of big, red-eyed insects will take over the great outdoors. It will be loud and it will be crunchy.
But guess what? They will be mostly harmless…mostly.
- One thing to consider is that they can potentially harm young trees and shrubs, especially fruit trees. After the deafening mating calls, the females often make small slits in slender twigs to lay their eggs. Think 3/16” to 7/16” branches—the size of a pencil. The nymphs will hatch, fall to the ground, and lay low for another 17 years. But the egg-laying can pose problems as those small slits can weaken and damage young, vulnerable trees and shrubs.
Some strategies to minimize damage:
- If you have smaller or newly planted trees or shrubs, consider wrapping them in fine-mesh netting before the May emergence. Make sure to tie the netting to the trunk at the bottom. Remove the netting after the emergence is over in June.
- Delay planting any smaller new trees or shrubs until after the emergence ends in June. Even better wait until fall (which is a great time to plant trees and shrubs anyway).
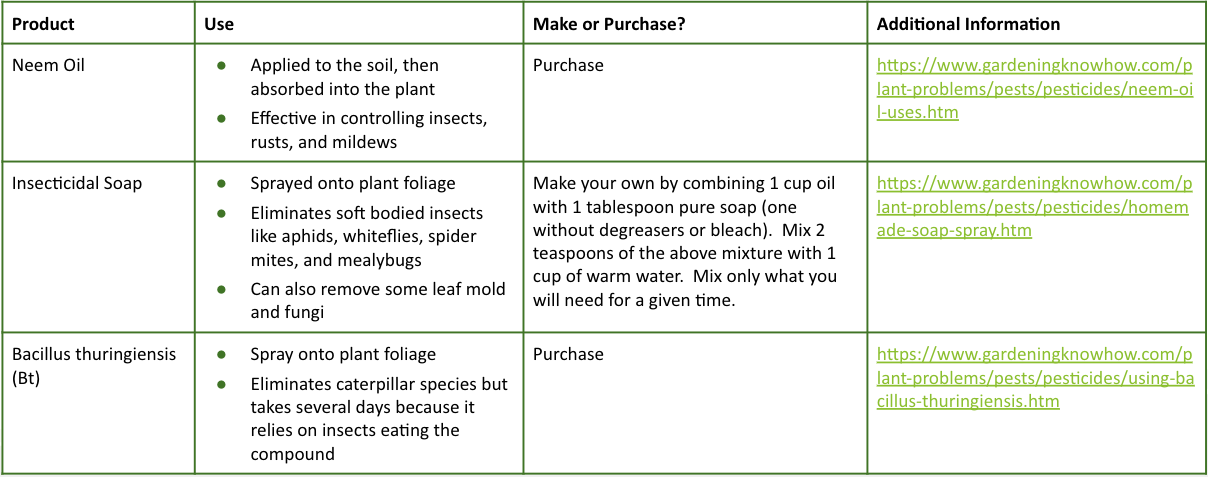
Organic pesticide alternatives:
- Soapy water: mix 2 tsp of dish soap w/ 1 pint of water; spray on soft-bodied insects like aphids, mites, whiteflies, and thrips; for Japanese beetles, hand pick them off and drop them in the soapy water
- Essential oils: mix 10 drops of oil with 1 cup of water in a spray bottle —try rosemary oil, lavender oil, lemongrass oil for some insect larvae like cabbage loopers
- Try peppermint oil, orange oil for squash bugs, aphids, whiteflies
- Last Resort – Neem oil?
- Neem oil is from the seeds of the Neem tree. It has two active ingredients: Azadirachtin and clarified hydrophobic neem oil. It is used on both insects and fungal diseases. For insects the oil coats their bodies and suffocates them. It can be effective against aphids, beetle larvae, lace bugs, leafhoppers, leaf miners, thrips, and whiteflies. However, like all broad spectrum pesticides, it can also harm pollinators and beneficial insects.
